PacsCube VIE Website Help Documentation
1. INTRODUCTION
PacsCube Virtual Image Exchange (VIE) is an image sharing platform,
allowing for the management of outside CDs/DVDs and the sharing of images across
the internet as an alternative to sending physical CDs/DVDs.
DatCard understands that the acceptance and adoption of image sharing may
be difficult for some physicians and/or organizations; therefore, PacsCube VIE
offers a hybrid approach, bridging the gap of outside CD management, physical
CD distribution and true image sharing.
PacsCube VIE offers an integrated solution to manage workflow needs within a single, simple to use interface.
This document provides an explanation of the features within PacsCube VIE.
1.1.Managing Outside CD
PacsCube VIE provides a web based Media Importer with a built in document
scanner application (PacsCubeScan) to manage the overwhelming burden of
receiving outside CDs from other organizations. It allows for the import and reconciliation
of DICOM and non-DICOM images and/or the scanning of paper documents from any
workstation within your organization utilizing any TWAIN or WIA compliant multi-function
printer or existing document scanner. Media Importer also allows organizations
to choose between importing directly to PACS or importing into their local
cloud storage for future evaluation.
Media Importer encompasses thirteen (15) years of knowledge in importing
and reconciling difficult-to-read CDs/DVDs and is free to you as a user.
1.2. Physical CD Distribution Versus Image Sharing
Organizations have distributed thousands of CDs a year to their referral
physician base and to other organizations. When embracing new technologies such
as True Image Sharing, it is often difficult to balance organizational needs
while waiting for other organizations and physicians to embrace these newer
technologies as well. Even in the best of circumstances with a very
cooperative referring physician base, sometimes making all of them happy is impossible.
For this reason, PacsCube VIE allows for the physical creation of discs or for
the electronic sharing of images, in one user interface.
When utilizing Virtual Image Exchange, images and the reports are delivered
by the Agilisys Image Exchange Network to organizations or to a physician’s Agilisys
Inbox. When the content arrives, the Network notifies the recipients they have
images for review by email. By simply clicking on a link within the email the
recipient can view, download or forward the images to yet another recipient.
The Agilisys Network provides a simple interface much like a CD would for fast
delivery and display of the images on a recipient’s desktop and/or iPad®.
By utilizing existing PacsCube connections to get images and reports, VIE
is extremely powerful and cost effective to an organization. Images and reports
are simply delivered to the cloud in the same manner as they make it onto PacsCube
CDs today, allowing an organization to image share when they are ready.
This unique approach maximizes workflow while being flexible to the
referral physician base, allowing them to choose the method of image delivery
they prefer.
2. ACCESSING PACSCUBE VIE
PacsCube VIE is
implemented as a website hosted by DatCard’s Agilisys cloud. As a registered
member of PacsCube VIE / Agilisys, physicians and organizations can receive
images for free. To sign up as a registered user, visit
www.pacscubevie.com or
www.agili-sys.com.
Users who pay
a small subscription fee are allowed to contribute to the virtual image
exchange and may share their images with anyone. Recipients of the images may
view an unlimited number of images for free and additionally may download the
images (sending them to PACS) at no cost.
All registered
users and organizations receive a default Inbox in which they receive and view
images. Facility Inboxes are managed by administrative users assigned to the
organization allowing facilities to manage and customize their workflow.
Additional Inboxes
may be added to an organization by contacting DatCard at 888.263.5882.
3. SIGN IN
Users visiting PacsCube VIE / Agilisys are presented with the
Sign In page. If already registered as a user, simply enter the email address
(user name) and password. If not yet a member, click on the "Sign Up for New
Account" link and in just a few clicks you can become a member for free.
For those members who may have forgotten their password,
Agilisys will email a new temporary password by clicking the “Forgot Password”
link.
Additionally, this page allows for the entry of a Quick View
or a Remote Upload access code (AIX Code).
4. INBOX
Every Organization and User is assigned an Inbox on the Agilisys
Network. The Inbox becomes the user’s primary workspace allowing them to
view images and related documents. Additionally, the Inbox also provides
features to help the user manage their daily workflow by allowing them to
organize their work lists.
4.1 Inbox Selector
The Inbox Selector allows a user to select between multiple inboxes of
which a user may have access.
By default, when the page displays, the Inbox Selector will remember the
last inbox the user selected.
To select an inbox, click the down arrow of the Inbox Selector, and a
list of the inboxes (of which you have viewing permission) will display. Select
the inbox you would like to work from. For each inbox selected, a Study List
will display. Each inbox selection produces a unique Study List.
From the Study List a user can view images or related documents and
perform other operational functions.
Some users may have access to organization or special interest group inboxes.
These inboxes can be seen by multiple users and are meant for collaboration
between users. Organizations and special interest group inboxes are managed by the
facility and access to these inboxes must be granted to you before they will
appear within your Inbox Selector.
4.2 Search
The Inbox page allows the user to search within the
displayed study list. The Search Field and the Study Date From and To field allows
the user to search across all fields/columns within the active Study List.
4.3 Study List
The Study List displays information about the patient and
the study by listing the following: Days available for viewing, Patient’s Name,
Patient ID, Modality type, Study Description, and the Facility that shared the
images.
The Study List also provides a View Image Selector and a
Selection indicator for viewing or performing other operational functions.
4.4 Study Operators
When utilizing the Study Selector for a given study(s), a
set of Study Operator icons will appear.
By clicking on a given Operator, the user can toggle between
the following functions:
4.4.1. Flag/Unflag
To mark a study(s) as Flagged/Unflagged select the study(s)
utilizing the Study Selector. Next, select the Flag Operator icon. Marking a
study as Flagged makes the study eligible to appear on Flagged filtered Study
List. Removing the Flagged option from a study removes it from the Flagged
filtered Study List.
To mark a study(s) as Deleted select the study(s) utilizing
the Study Selector. Next, select the Trash Operator icon. Deleting a study
removes it from the Study List. The study is then moved to the Study List found
within the Deleted filtered Study List.
4.4.3. Read/Unread
Marks a study as Read or Unread allowing it to appear bold
if Unread, and not in bold if it has been Read.
To mark a study(s) as Read/Unread select the study(s)
utilizing the Study Selector. Next, select the Read Operator icon.
4.4.4. Forward to another user
The Forward operation allows you to forward a study(s) to
another user’s inbox or allows you to directly send the study(s) to an
organization.
To forward a study(s) select the study(s) utilizing the
Study Selector. Next, select the Forward Operator icon. When the Forward
Studies screen appears enter the recipient’s email address or name and click
the “Search” button. If the recipient is found, select them from the User List
to add them as a recipient. If the user is not found you can send a new user
an invitation to join Agilisys by clicking the Send Invite option found at the
bottom of the User List window. Once you have completed adding one or more
recipients, click on the “Forward” button to complete the operation.
4.4.5. Move/Copy
To Move a study(s) to another Inbox or Folder select the
study(s) utilizing the Study Selector (NOTE:
This function is not available from the “All” or “Organization Name” boxes. In
order to access the Move/Copy feature, you need to first select the specific
inbox where the study is located (e.g. – “General Inbox”)). Next,
select the Move/Copy Operator icon. Select the Inbox/Folder in which you have
access to Move or Copy the study(s) from the Inbox Selector. Next, click on
the “Move” or “Copy” button to complete the transaction.
4.5. Study List Filters
The Study List Filters allow users to manage their
Inbox(s). When a Study List Filter is selected for a given Inbox the study
list is limited to those studies matching the selected filter.
Used in combination with the Study Operator icons, users can
organize their workflow into the following Study Lists:
4.5.1. Flagged
The Flagged filter will limit the study list to those
studies that have been flagged through the use of the Flagged Study Operator
icon.
4.5.2. Unflagged
The Unflagged filter will limit the study list to those
studies that have not been flagged.
4.5.3. Read
The Read filter will limit the study list to those studies
that have been read through the use of the Read Study Operator icon.
4.5.4. Unread
The Unread filter will limit the study list to those studies
that have not been read.
4.5.5. Deleted
The Deleted filter will limit the study list to those
studies that have been deleted through the use of the Delete Study Operator
icon.
4.5.6. Sent
The Sent filter will provide an audit trail for each study
shared.
5. MANAGEMENT
The “Management” page allows users to manage Inboxes of
which they have administrative privileges. In addition, it also allows
organizations to: manage users as employees, physicians as recipients and
allows for the creation and management of Group Folders for special interest
groups.
5.1. Inbox/Sub-Inbox Membership
Access to Inboxes is controlled by the owner of the Inbox;
therefore users and organizations control access to their Inboxes and Sub-Inboxes.
Granting access of an Inbox/Sub-Inbox to multiple users allows the Inbox to be
viewed by all members within the group; therefore, they all see the same work
list and can access the same images.
For example, Dr. Jones might want to add his assistant as a
member to his inbox. Dr. Jones can easily do this because he is the owner of
his Personal Inbox. Once access is granted, his assistant can sign into
Agilisys and see Dr. Jones’ Inbox in addition to their Personal Inbox. When
the assistant selects Dr. Jones’ Inbox from the Inbox Selector, they will see
the same study list as Dr. Jones. Additionally, Dr. Jones may choose to give
his assistant administrative privileges allowing his assistant to manage
membership to his Inbox.
5.1.1.Adding Members to Inboxes/Sub-Inboxes
To manage membership of a Sub-Inbox or Inbox, select the
Inbox/Sub-Inbox from the Inbox Selector. Next, select the “Members” tab. The
members of the Inbox/Sub-Inbox will be displayed. Add or Remove users as
needed.
At any time you can click
on the Send Invite option to send an email to any user asking them if they
would like to join Agilisys as member.
5.1.2. Edit User Inbox/Sub-Inbox Privileges
To Edit membership privileges for a given Inbox/Sub-Inbox,
select the Inbox/Sub-Inbox from the Inbox Selector. Next, select the “Members”
tab. The members of the Inbox/Sub-Inbox will be displayed.
5.2. Inbox/Sub-Inbox Management
PacsCube VIE/Agilisys allows for the creation of sub-inboxes
(sub folders) for a given Inbox. Users and Organizations can create an
unlimited number of Inboxes/sub-inboxes to help organize data and create
customized workflows. Once a sub-inbox is created for a selected Inbox, images
can be moved from the Inbox to the sub-inbox for collaboration by special
interest groups. Sub-Inboxes, like Inboxes, have their own set of unique
members (which can be different from the Inbox itself) allowing all members to
see the same study list.
Owners of Inboxes and Organization Administrators control
membership to sub-inboxes as they see fit to manage workflow
To manage Sub-Inboxes, select the Inbox you would like the
folder to be associated with from the Inbox Selector. Next, select the Folders
Sub-Inboxes option from the Options List.
By selecting the Sub-Inboxes option, the system will display
all the sub-inboxes associated with the selected Inbox.
5.2.1. Adding New Sub-Inbox
To add a new Sub-Inbox, select the Inbox you would like the
new sub-inbox associated with by using the Inbox Selector. Next, click the “Add
New Sub-Inbox” button.
Enter a Sub-Inbox Name, then click on the “Add” button.
5.2.2. Editing Folders
To Edit an existing Sub-Inbox, click on the sub-inbox’s name
from the list of folders. Edit the Folder Name or Disable the folder then
click on the “Update” button.
5.2.3. Deleting Sub-Inboxes
To Delete a sub-inbox, select the sub-inbox from the Sub-Inbox
List. Next, disable the sub-inbox and select the “Update” button. Sub-Inboxes will
not be deleted but they will be disabled.
5.3. Recipient Management
Organizations can grant or revoke viewing privileges to
Recipients for a given organization. Adding a Recipient to an organization
grants viewing privileges to the Recipient; additionally, the organization may
also choose to advance other privileges to the Recipient such as the ability to
download, forward and/or view reports.
To grant Recipient privileges to a user, select the
organization from the Inbox Selector. Select Recipients from the options
menu. The current list of valid recipients will display.
To search for an existing Recipient use the Search Fields by
entering a search criteria. The Search Field searches across all columns
within the Recipient List display.
5.3.1. Adding a Recipient
To add a Recipient, select the “Add New Recipient” button
for the selected organization.
Next, enter the recipient’s name or email address within the
Search Field. Next, click on “Search”. If the recipient is found, select the
user (click on green “+” sign), to add the user to the Recipient List.
If the user is not found, select Send Invite at the bottom
of the Search Results screen to send a new user invite.
5.4. Users Management
Organizations can grant Users (employees) access to their
organization. This allows the user to perform operational tasks (within the
organization, as a representative) such as viewing images from the
organizational Inbox/folders, the generation of Quick View/Upload codes and the
viewing of management reports such as Package Usage statistics.
5.4.1. Adding an Organizational User
To add a user, select the “Add” button for a selected
organization.
Next, search for the user by entering the user’s name or
email address into the Search Field. If the user is found, select them to add
them as an organizational user.
If the user is not found, select Send Invite at the bottom
of the Search Results screen to send a new user invite.
5.5. Share
The “Share” tab allows users to share images across the
Agilisys Network. Image sharing is only available to users that belong to
organizations that subscribe to PacsCube VIE. Image sharing can be done in
several ways:
Quick View Request
Users or Organizations can issue Quick View Codes to anyone
requesting images (including non-Agilisys users). The “Quick View Request”
feature allows for the creation of a package of studies or scanned images. The
recipient of the Quick View Code is notified of the code by email allowing them
to click on a link contained within the email. This link allows them to view
the contents of the package for a period of twenty-four (24) hours. Once the
expiration of the Quick View Code occurs, the packages are no longer viewable
to any user; however, the packages and images are NOT deleted from the system
and shall be retained for 90 days. Each Quick View is tracked every time the
package is viewed.
Share Images
Users or Organizations can share images with other PacsCube
VIE and Agilisys users. The Share Images feature opens a PacsCube-like
interface allowing the user to query their PACS and select Recipients and/or
Organizations. Additionally, if the Organization has a PacsCube Robotic, this
feature will allow them to create physical discs.
Upload Request
Users or Organizations can issue Upload Request Codes to anyone
who would like to upload a disc containing images to the Organization. The
Upload Request requires the user to collect information about the individual
that will be uploading along with information about the patient and study they
will be uploading. Upload Requests can be issued as a “One-Time Transfer”
event or can be issued as a “Permanent” event.
Quick View Management
Users can re-activate expired Quick View Codes within this section.
Upload Management
Users can re-activate expired Upload Codes within this section.
5.5.1.Quick View Requests
To grant a Quick View Access Code, select Quick View Request
from the Share menu options list. Next, enter the Recipient’s Name along with the
Recipient’s Email Address (Note – the Recipient’s Email Address is used to send
the access code to the recipient).
Selecting the “Create Package” button opens a Study Search
window, allowing you to select studies that you would like to share as part of
the Quick View package.
For details on using the Study Search window, please see
section 5.5.2.
5.5.2. Share Images
Images can be shared directly from PacsCube VIE by selecting
Share Images from the Shared menu options list. In doing so, the Share menu
opens a Study Search window allowing you to select studies that you would like
to share through the burning of a physical disc (if configured) or by sending a
virtual disc. To create a physical or virtual disc, follow the steps below:
1. Click on "Connect" button for the PacsCube you want to handle the sharing.
2. Patient/Study
Search - After logging in, the Create Disc page appears. It
contains search fields allowing you to specify the criteria to use when
searching for exams.
The PacsCube supports the following DICOM search options:
•
Patient’s Name – To search for a patient by name,
enter the patient’s name (last name, then first name). When searching by name,
wildcards are automatically applied (e.g. entering “SMI” will return exams for all patients with a last name
that starts with “SMI”). For
patients with common last names, you can limit the search by typing the
patient’s complete name as it appears in your PACS. Depending on your PACS, the
correct name format may vary. Vendors can use commas or the carat symbol “^” as
a delimiter between last name and first name, and some may or may not require a
space character after a comma (e.g. “Smith,
John” instead of “Smith,John”).
•
Patient ID (MR#) – To search by Patient ID, enter
the patient’s complete ID as it appears in your PACS.
•
Date Range - To search for a patient by “study
date”, enter a “From” and “To” date in the format specified on the screen. To
auto-populate these fields to search for exams from today or yesterday, click
on the “Today” or “Yesterday” button.
•
Referring Physician – To search by referring
physician’s name, enter either a partial or complete name as it appears in your
PACS.
•
Accession # - To search for a specific examination
by accession number, enter the complete accession number as it appears in your
PACS.
•
DICOM Image Source – This option allows you to
specify which remote DICOM server to query for exams, since iRecall can be
configured to search for and retrieve exams from one or more servers. For
example, some facilities may have more than one PACS server, or they may have
both a PACS and a 3D image workstation that supports the query/retrieval of
exams. The Local Host entry will search the local PacsCube database for exams.
 ** WARNING ** - Searching by large date ranges or
common last names can return a very large data set and cause iRecall to take a
very long time to display search results. This may also impact the performance
of your PACS.
** WARNING ** - Searching by large date ranges or
common last names can return a very large data set and cause iRecall to take a
very long time to display search results. This may also impact the performance
of your PACS.
3. Once the
search criteria have been entered, click on the "
Search" button. Once
the search has finished, iRecall will display a list of studies that match the
specified criteria.
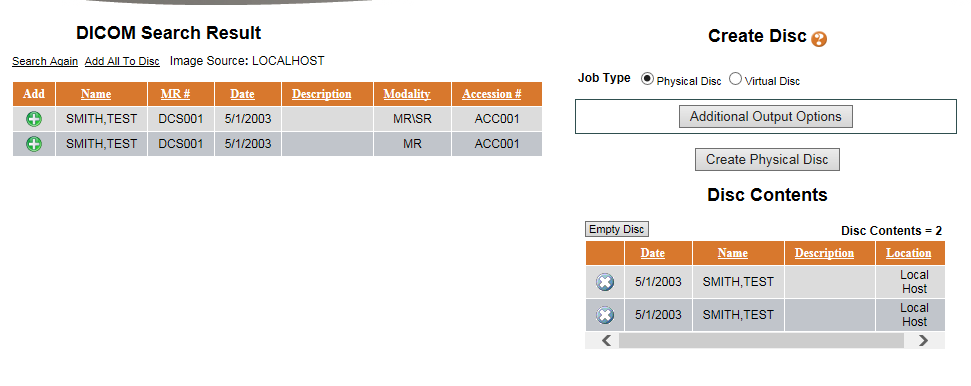
4. To select
a study, click on the green “+” icon next to the study. This will add the study
to the “Disc Contents” page on the right side of the screen. Continue to select
as many patients/exams as you would like to include in the job. If you need to
execute another search for a different exam, click on the “Search Again” link
found just above the list of search results.
** If the total
number of studies selected exceeds the capacity of a CD/DVD, the system will
automatically span the rest of the job to however many discs are required to
fulfill the job request. Each CD/DVD will be labeled with a unique numbering
system identifying that it is part of a series. In addition, your PacsCube can
be configured to automatically burn to DVD if the amount of data exceeds the
size of a CD. This option is not enabled by default. Please contact DatCard
technical support to have this feature enabled.
5. Next the "Create
Disc" page may appear different depending on if your system has been
activated with PacsCube VIE/Agilisys. If the system has been activated with
Agilisys you will see options allowing you to create a "Physical Disc"
(Default) or a "Virtual Disc".
·
Creating a Physical Disc - To create a disc (utilizing the
default options) simply click on the “
Create Physical Disc” button. If
you would like to create a disc with customized options, click on the “
Additional
Output Options” button; this will expose a list of options:
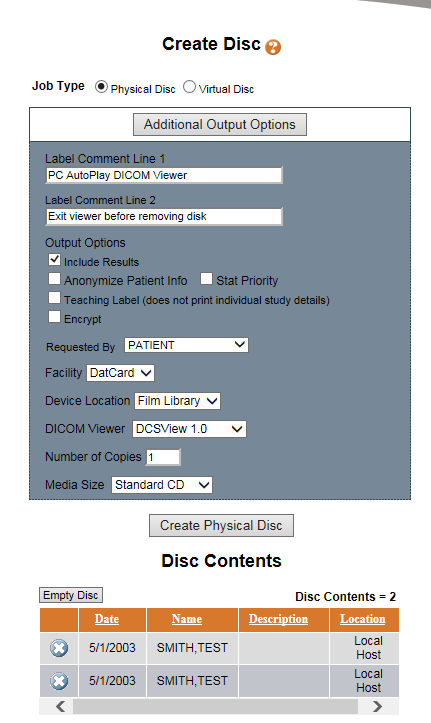
•
Label Comments - Label comments typed into the Line
1 and Line 2 fields will print on the CD/DVD label.
•
Include Results – The PacsCube can be set up
to retrieve results (reports) from a variety of sources (e.g. MITRA broker, Structured
Reports, HL7, etc.).
•
Anonymize Patient Info – This feature will change
the patient’s identification to a set of unique identifiers effectively making
it impossible to identify the real patient’s information. Additionally, users
can specify the patient name and ID that the study will use. It is possible to
add additional tags in the DICOM header to anonymize; please contact DatCard
technical support for more information.
•
STAT Priority – This feature prioritizes job
requests moving it to the front of the CD/DVD burning queue ahead of all other
queued jobs of non-priority status.
To grant an Upload Request Code select Upload Request from
the Shared menu options list. Select the Duration (One-Time Use or Permanent)
the Code will remain active. Next, enter the Recipient’s Name along with the
Recipient’s Email Address (Note – the Recipient’s Email Address is used to send
the access code to the recipient). If additional patient and study information
is requested, the entry of this information is optional. Next select the “Submit”
button. The Upload Code is generated and sent to the recipient’s email
address.
To revoke or reactivate a Quick View Code, select Quick View
Management from the Share menu options. A list of the most current issued
Quick View Codes will display.
If the Code you are looking to manage does not display
within the list, utilize the Search Field by entering the Quick View Code, the
Recipients Name or Email Address.
Next, select the code(s) you would like to manage. In doing
so, operational icons will appear at the top of the Codes Listed. Next, select
the operational icons to revoke or reactivate the code.
To revoke or reactivate an Upload Code, select Upload
Management from the Share menu options. A list of the most currently issued Upload
Codes will display. If the Code you are looking to manage does not display
within the list, utilize the Search Field by entering the Quick View Code, the
Recipient’s Name or Email Address. Next, select the code(s) you would like to
manage. In doing so, operational icons will appear at the top of the Codes
Listed. Next, select the operational icons to revoke or reactivate the code.